| User Interface/ Binding Macros to Compass Menus |
Binding Macros to Compass Menus
You can create any number of compass menus. Compass menus are context sensitive in the same manner as key bindings: the contents of the current compass depends on the selected object, current tool and keyboard modifiers. For example, you can create a compass, which is activated when you hold down a certain key while dragging with the right mouse button. Each menu item in the compass is bound to a named macro, which is executed when the item is selected. These tutorials show you how to create context sensitive compass menus and
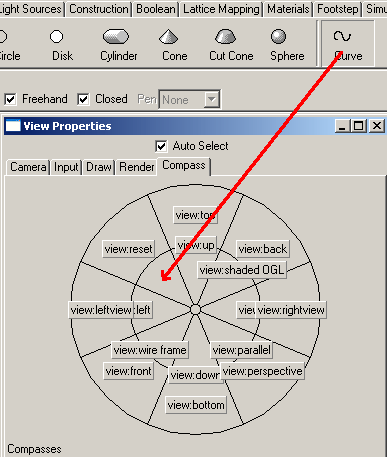
how to bind macros to them. Create compass menus using drag & dropYou can easily set up a new compass menu by simply dragging desired tools into it. For example, to add a tool 'create freehand closed NURBS curve' to the default compass menu. 1. Open the view property window and go to the 'Compass' tab. Select the first compass from the 'Compasses' list (Compass). 2. Activate the NURBS/Curve tool and set the 'Closed' and 'Freehand' options. Then press the Ctrl key down and drag & drop the 'Curve' tool button into the desired position of the compass menu.
A sphere specific compassLet's assume you are working in a company designing ball bearings and you frequently need to duplicate a sphere and move it in the 'x' direction. You can increase your productivity by creating a compass menu, which is automatically used when an analytic sphere is selected. It allows you to duplicate and move the selected spheres by using one single operation. We start by recording a named macro for this purpose. 1. Create an analytic sphere and record a named macro 'mymacro' which duplicates and moves the sphere (If you don't remember how to record macros, check out the tutorial Recording and Executing Macros). 2. Select 'View Properties' from the view's pop-up menu and go into the 'Compass' tab. In this tab you can manage compass menus. 3. Make sure the analytic sphere you created is selected and set the 'Selected Object' check box. Then click the 'Add' button. A new sphere specific compass is created.
The new compass is shown whenever you drag with the right mouse button and
a sphere is selected. You can test this in the view window immediately
(just drag with the right mouse button in the view window to see the empty compass
menu).
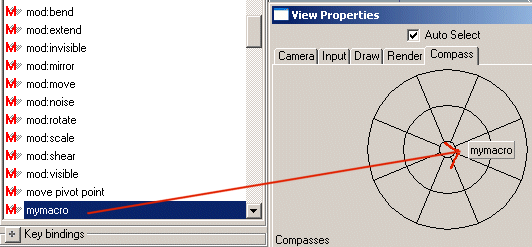
The compass is now ready. You can close the view property window. 5. Select an analytic sphere and drag with the right mouse button in the view window to open the sphere specific compass menu. Select 'mymacro' in the compass menu and the macro is executed.
A key sensitive compassIn addition to selected objects, you can also create keyboard, tool and edit state specific compasses. For example, you can create a compass, which is opened whenever you drag while holding down the 'F1' function key. To do this: 1. Go to the 'Compass' tab of the view property window as described in the previous example. 2. Set the 'Key' check box, click the 'Key' string field below it and hit the 'F1' key. You can now see the string 'F1' in the key field. 3. Click the 'Add' button. This creates a compass called 'Compass_F1'.
4. Drag & drop the suitable macros (or tool icons) to the compass. Deleting and editing compass menusYou can change and delete compass items using the 'Compass' tab of the view property window. If you want to change a macro binding of a certain compass area, simply drag & drop a new macro into the sector in question. To delete a named macro, click the right mouse button over the desired compass sector. This opens a pop-up menu, which includes a tool for deleting the macro binding (the actual macro is not deleted). The 'Clone' and 'Delete' buttons near the bottom edge of the 'Compass' tab
duplicate and delete entire compasses.
|


 |
 |